Overview
TimeWarp is a time-bending audio effect for stretching, smearing, reversing, freezing, and transforming incoming sound in real time.
This guide follows the plugin from top to bottom, the same way your eyes travel across the interface. Start with a preset, steer the Warp Field, refine the processing mode, then finish with the main control panel.
01InstallationInstall TimeWarp and make it available in your DAW.
- Download the TimeWarp installer from your account downloads section.
- Quit your DAW before installing.
- Run the installer and follow the prompts for your operating system.
- Reopen your DAW and rescan plugins if TimeWarp does not appear automatically.
- Insert TimeWarp on an audio, instrument, bus, or effects track.
02ActivationAuthorize the plugin with your TimeWarp license.
A valid TimeWarp license is required for activation.
- Open TimeWarp in your DAW.
- Enter the license information provided with your purchase.
- Complete activation while connected to the internet.
- Restart your DAW if the plugin asks you to reload after activation.
Confirm that the license details were entered exactly as provided and that your system clock and internet connection are working normally.
03Quick StartGet from an inserted plugin to a moving time effect.
- Load TimeWarp on an audio track.
- Pick a factory preset from the preset bar at the top.
- Drag the puck in the
Warp Fieldto shape the main time movement. - Choose a
CharacterandProcessingmode if you want a different flavor. - Use the bottom controls to set
Freeze,Density,Jitter,Window,Rate,Mix, andOutput.
For subtle motion, keep the puck close to center and Mix below
50%. For more dramatic sound design, drag the puck farther from center,
increase Window, and explore characters such as
Fracture, Mirage, Granular, or
Reverse.
04PresetsBrowse factory sounds and manage your own starting points.
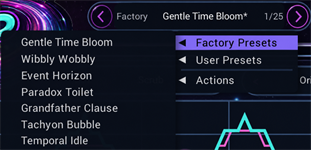
The preset bar at the top lets you move through sounds quickly.

The preset bar provides preset browsing and status at a glance.
Left/Rightarrows step through presets.- The preset name shows the current preset.
- The preset menu opens factory presets, user presets, and preset actions.
- The dirty marker indicates that the current preset has been edited.
Factory presets are designed as launch points. Some are gentle, some are more unstable, and most are meant to invite adjustment.
User Presets
From the preset menu you can:
- Save the current settings as a user preset.
- Update the current user preset.
- Import a
.twpresetfile. - Export the current preset.
- Reveal the user preset folder.
- Delete the active user preset.
05Warp FieldSteer time movement, axis behavior, and the plugin’s character.
The Warp Field is the main performance area. This is where you steer the core time movement and choose the plugin’s overall flavor.
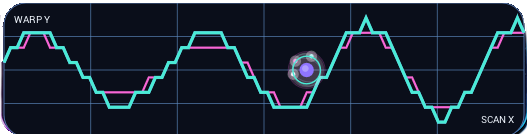
The puck combines scan position and warp amount in one performance control.
Warp Field Puck
The puck controls the plugin’s main warp movement. You will not find separate on-screen knobs for Warp Amount, Scan Mode, or Scan Position; those duties live inside the puck.
- Move the puck left or right to change the scan position inside the captured time window.
- Move the puck up or down to change the warp amount.
- Keep the puck near the center for gentler motion.
- Push the puck toward the edges for stronger, stranger time behavior.
Dragging the puck horizontally temporarily puts TimeWarp in manual scan
mode. When you release it, automatic scanning resumes at the speed set by
Rate.
Reading the Field
Center area: more neutral and controlled.Higherorlowerpositions: stronger positive or negative warp behavior.Leftorrightpositions: different scan positions inside the captured time window.
Axis Lock Menu
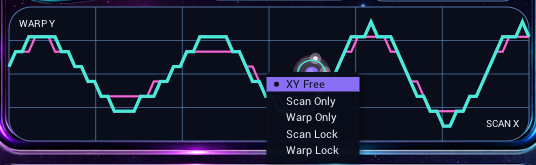
The Warp Field includes axis behavior options so you can decide what the puck is allowed to change.
XY Free: the puck controls both scan position and warp amount.Scan Only: the puck changes scan position only.Warp Only: the puck changes warp amount only.Scan Lock: scan position stays locked while vertical puck movement controls warp amount.Warp Lock: warp amount stays locked while horizontal puck movement controls scan position.
Character
Character changes the personality of the time warp. Each option gives the same core movement a different attitude: some are smooth and civilized, some are shimmery and scenic, and some sound like the audio found a shortcut through a wall.
The best way to learn them is through exploration and discovery. Start with Scrub, Elastic, or Diffuse when you want gentler motion, then wander into Granular, Fracture, Mirage, Reverse, or anything else that looks suspiciously fun.

Character changes the flavor of the core Warp Field movement.
Processing
Processing chooses how TimeWarp applies the warp across the sound.
Original: processes the whole signal as one piece.Multiband: splits the signal into low, mid, and high bands.Focus Band: focuses the effect around a chosen frequency area.
The selected mode changes what appears in the processing section below the Warp Field.

06Processing ModesShape the full signal, split it into bands, or target a frequency area.
The processing section shows the deeper controls for the selected Processing mode. This is where you shape which part of the sound gets pushed, split, focused, or left alone.
Original Mode
Original mode keeps the processing simple: the whole signal is treated as one piece. Use this when you want direct, full-range time warping without extra band shaping.
Multiband Mode
Multiband splits the signal into low, mid, and high bands. This lets different parts of the sound respond with slightly different motion.
Controls include:
Low Mid Crossover: sets where low frequencies hand off to mids.Mid High Crossover: sets where mids hand off to highs.Band Spread: increases the difference between the bands.Multiband Solo: listens toFull,Low,Mid, orHigh.
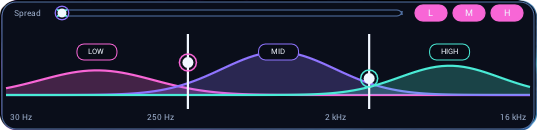
Multiband mode separates the signal into low, mid, and high regions.
Focus Band Mode
Focus Band applies the strongest attention to a chosen frequency area.
Controls include:
Focus Shape:Bell,Low Pass, orHigh Pass.Focus Center: moves the focus area.Focus Width: changes how narrow or wide the focus is.Focus Solo: listens to the focused area by itself.
Use Focus Band to target a vocal range, brighten moving textures, isolate a midrange smear, or make only the top end move.
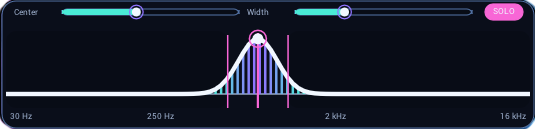
Focus Band concentrates the effect around a selected frequency area.
07Main Control PanelRefine motion, texture, blend, and final output.
The bottom control panel handles the supporting time controls, texture controls, and final output. After you have a preset and Warp Field movement you like, this is where you refine the behavior.
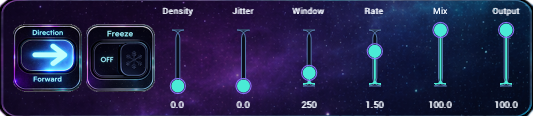
The main controls set movement, texture, blend, and output level.
Direction
Changes the scanning direction.
Forward: scans normally through the time window.Reverse: scans backward for reversed motion and pullback effects.
Freeze
Captures the current moment and holds it for processing.
Density
Increases the amount of overlapping motion in the effect.
- Low settings are clearer and more separated.
- High settings are thicker, smoother, and cloudier.
Jitter
Adds instability to the scan behavior. Small amounts add life. Larger amounts add wobble, glitch, and more obvious movement.
Window
Controls how much audio TimeWarp keeps available for warping.
- Short windows feel tighter, choppier, and more immediate.
- Long windows feel wider, slower, smoother, and more atmospheric.
Rate
Controls how quickly the effect moves through the time window when you are not actively dragging the puck.
- Slow rates create drifting and evolving textures.
- Faster rates create more obvious movement, tremble, rhythm, and flutter.
Mix
Blends the dry original sound with the warped sound.
Output
Controls the final level after processing. Use it to match the plugin volume to your bypassed signal.